Home
- Details
- Written by: po3dno
- Category: MSSQL
- Hits: 900
DECLARE @databasename VARCHAR(50) -- database name
DECLARE @sql VARCHAR(Max)
DECLARE db_cursor CURSOR READ_ONLY FOR
SELECT name
FROM master.sys.databases
WHERE name NOT IN ('master','model','msdb','tempdb') -- exclude these databases
AND state = 0 -- database is online
AND is_in_standby = 0 -- database is not read only for log shipping
OPEN db_cursor
FETCH NEXT FROM db_cursor INTO @databasename
WHILE @@FETCH_STATUS = 0
BEGIN
set @sql = 'alter database ['+ @databasename + '] set recovery simple;'
print @sql
--exec @sql
FETCH NEXT FROM db_cursor INTO @databasename
END
CLOSE db_cursor
DEALLOCATE db_cursor
- Details
- Written by: po3dno
- Category: Power Shell
- Hits: 918
(Get-WmiObject -ComputerName . -class "Win32_TSGeneralSetting" -Namespace root\CIMV2\TerminalServices -Filter "TerminalName='RDP-tcp'").SetUserAuthenticationRequired(0)
- Details
- Written by: po3dno
- Category: Power Shell
- Hits: 1034
If an attack made it into your active directory environment and got a golden ticket, there is a specific set of steps you need to take to make sure you've cleaned out the adversary:
- Disconnect the affected networks. Entirely.
- Remediate any persistence mechanisms left behind
- Reset passwords of ALL high privileged access accounts
- Reset passwords of all VPN access credentials (+other remote access you may have)
- Change the krbtgt hash using https://gallery.technet.microsoft.com/Reset-the-krbtgt-account-581a9e51 run in it the order of using first option 1, then option 2 and then option 3: (https://cdn-images-1.medium.com/max/1000/1*Gk48jksjPuThTrPnJNHW-w.png)
- Wait minimum 10 hours
- Change the krbtgt hash again using https://gallery.technet.microsoft.com/Reset-the-krbtgt-account-581a9e51 run in it the order of using first option 1, then option 2 and then option 3: (https://cdn-images-1.medium.com/max/1000/1*Gk48jksjPuThTrPnJNHW-w.png)
- Details
- Written by: po3dno
- Category: Other
- Hits: 891
If you copy the “MASTER .VHDX”, you could re-use it for multiple boots, even for other machines.
Here’s the procedure once you have an existing MASTER .VHDX already created.
First, copy and rename the .VHDX to a different name depending on what you will install, like “Windows_10_for_Testing_Betas.VHDX” or whatever. In my screenshots I’m still using a similar name than before, though.
1. Check initial boot loaders
You can configure the boot options of windows by using the command-line tool bcdedit.exe.
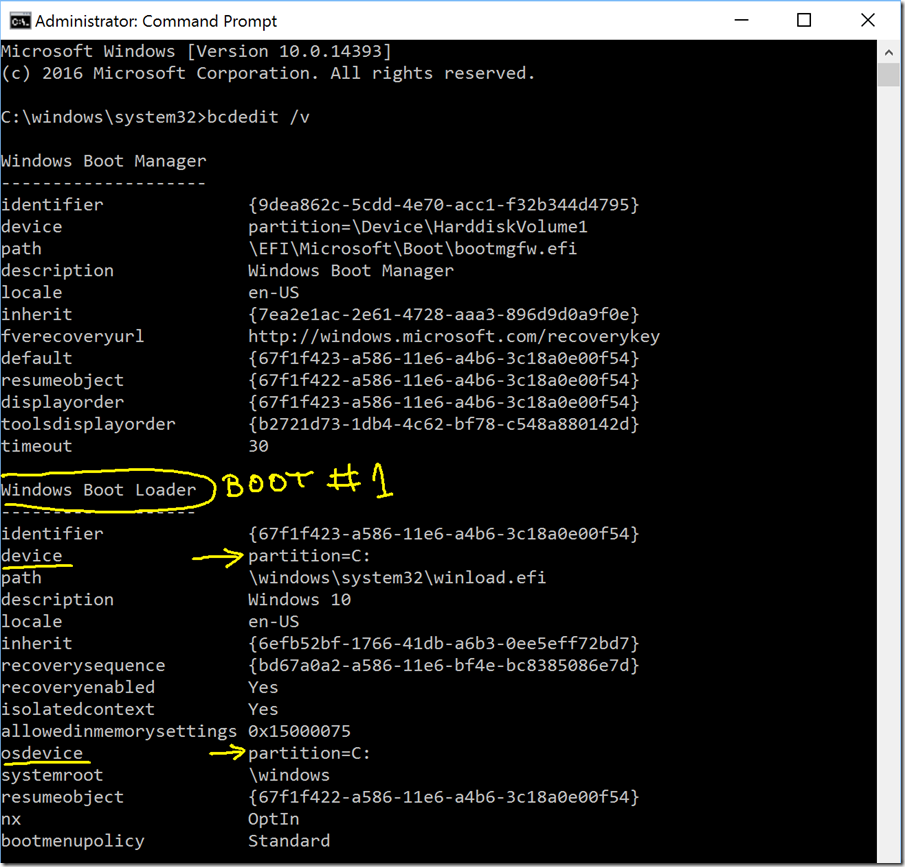
bcdedit /v
Let’s say you start in another computer with a single boot from a single regular partition, you’ll see a similar description to the following:
You can see that I currently just have a single boot loader, booting from the C: partition.
2 What we want to do is to create a second BOOT LOADER by copying the current Windows Boot Loader. Type:
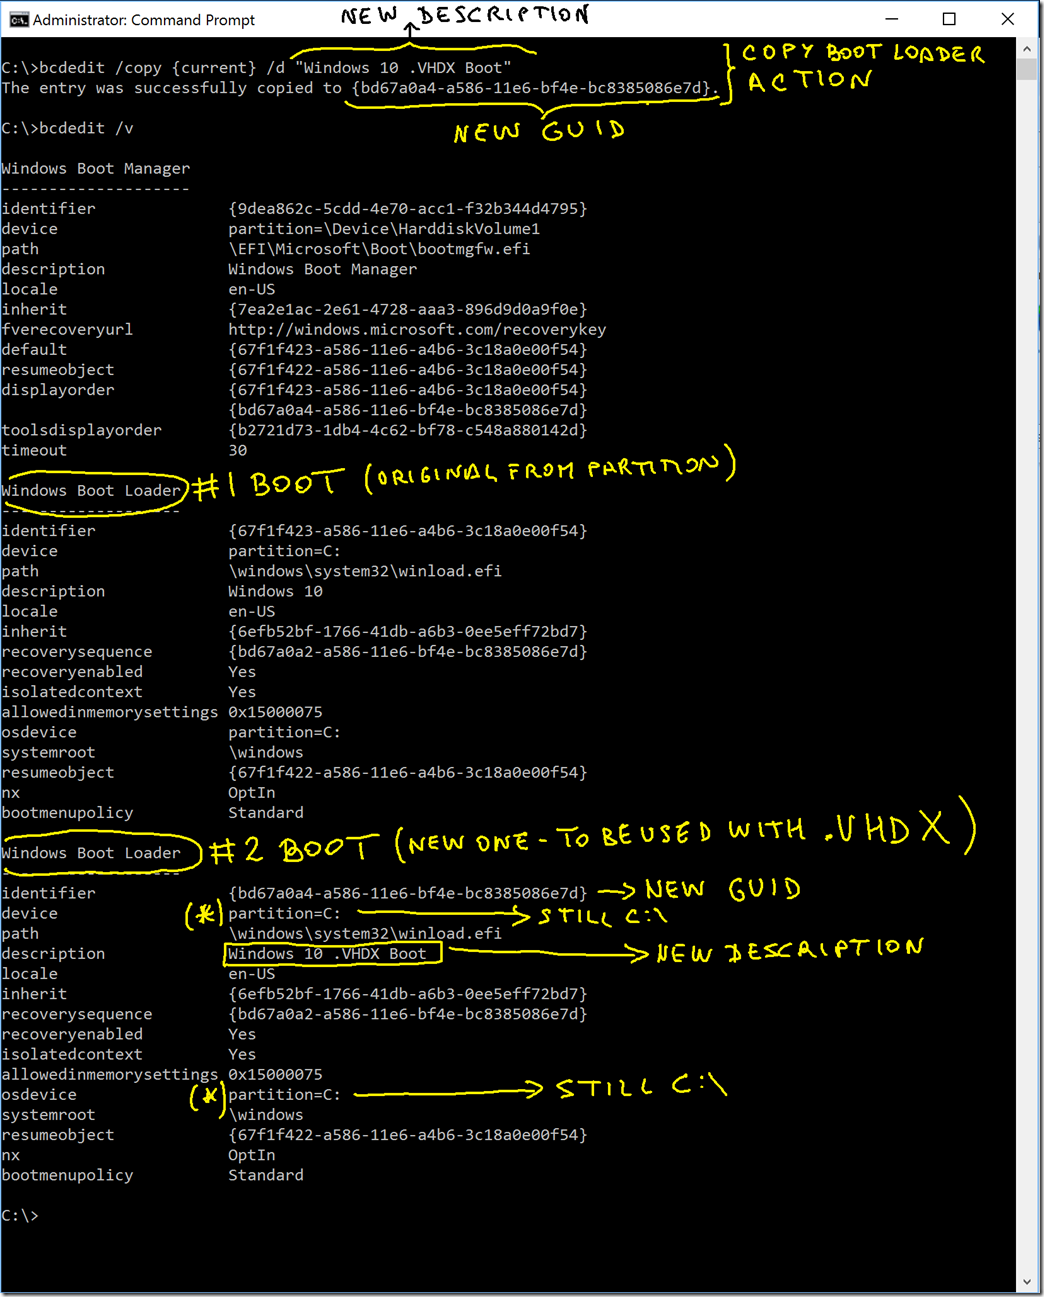
bcdedit /copy {current} /d “Windows 10 .VHDX Boot”
That line means you are copying the current Boot loader (the one I marked) but naming it with a different DESCRIPTION. And also, very important, when you copy any BOOT LOADER, the new copy will have a new GUID identifier, which is what you are going to use.
Then, type again bcdedit /v to see the new BOOT LOADER created:
You can see how now you have a second BOOT LOADER (#2 BOOT) with a different GUID than the original (#1 BOOT).
It also has the new description applied like “Windows 10 .VHDX Boot”. You’ll see that description when selecting the Boot option when starting your machine.
However ,you are still not done, as that second BOOT LOADER is still pointing to the C:\ partition, and you want it to be pointing to the .VHDX file!
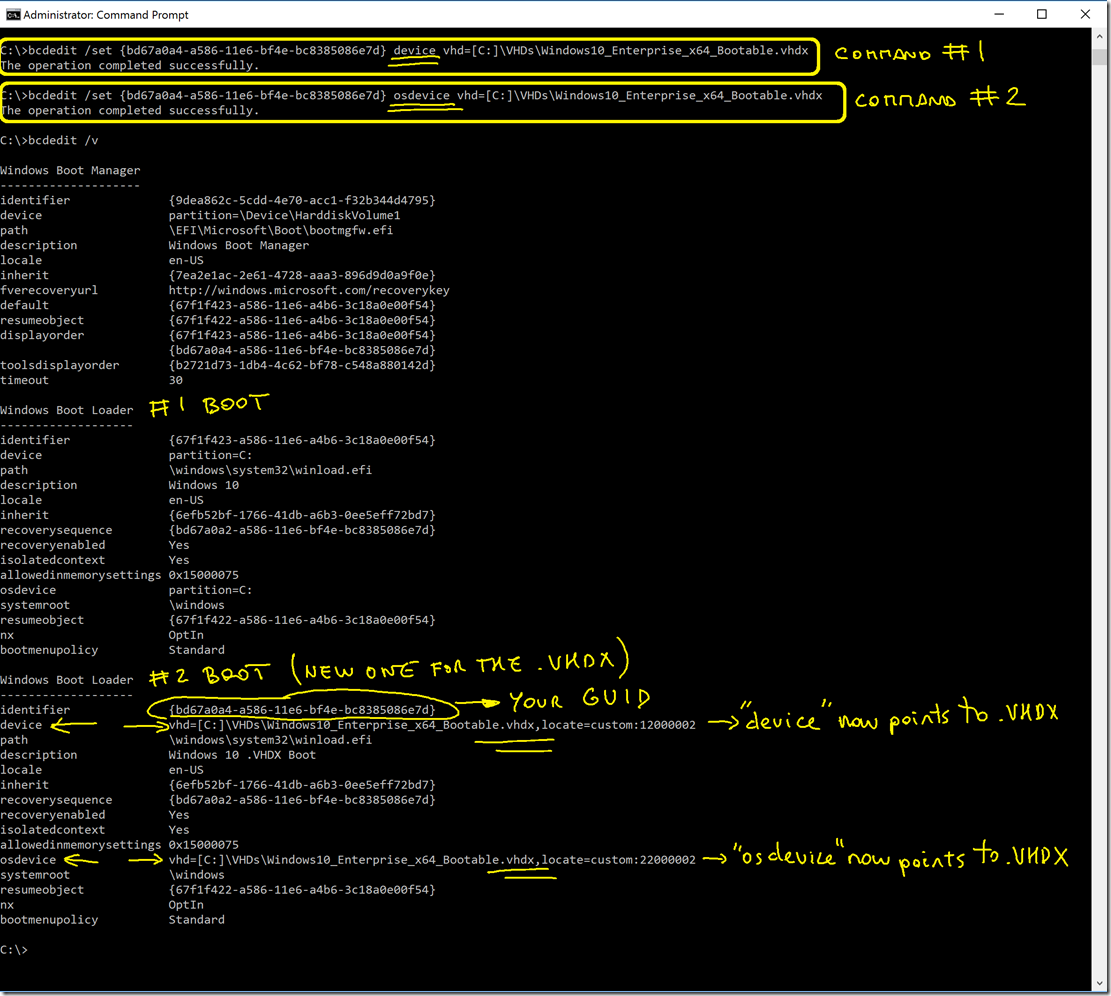
3 Copy the new GUID (from BOOT #2) with the mouse, so you can use it in the next step. In this case I copy: {bd67a0a4-a586-11e6-bf4e-bc8385086e7d}
4 In order to point BOOT LOADER #2 to your .VHDX file, type the following 2 commands:
bcdedit /set {My_new_GUID_Number} device vhd=[C:]\VHDs\Windows10_Enterprise_x64_Bootable.vhdx
bcdedit /set {My_new_GUID_Number} osdevice vhd=[C:]\VHDs\Windows10_Enterprise_x64_Bootable.vhdx
Note the difference in “device” and “osdevice”..
Now, you are done with the “hard” configuration.
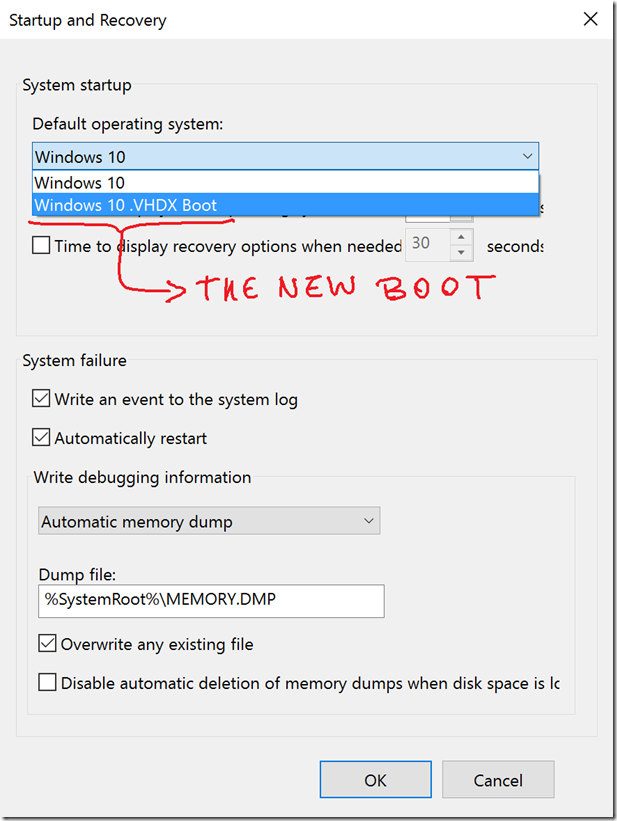
Check that you have this new boot from Computer properties –> Advanced System Settings –> Advaced –>Startup and Recvovery –>Settings button:
You can just reboot the machine and select the BOOT option for your new .VHDX, and it’ll boot natively from that .VHDX!
Other BCDEDIT configurations:
You can update your boot loaders with commands like the following using the GUID of the BOOT LOADER you want to change:
TO CHANGE THE DESCRIPTION
bcdedit /set {xxxxxxxx-xxxx-xxxx-xxxx-xxxxxxxxxxxx} description “Windows 7 .VHD Image”
COPY
bcdedit /copy {Original_GUID_Number} /d “my new description”
or
bcdedit /copy {current} /d “my new description”
or
bcdedit /copy {default} /d “my new description”
- Details
- Written by: po3dno
- Category: MSSQL
- Hits: 870
DECLARE @name VARCHAR(50) -- database name
DECLARE @path VARCHAR(256) -- path for backup files
DECLARE @fileName VARCHAR(256) -- filename for backup
DECLARE @fileDate VARCHAR(20) -- used for file name
-- specify database backup directory
SET @path = 'D:\Backup\'
-- specify filename format
SELECT @fileDate = CONVERT(VARCHAR(20),GETDATE(),112)
DECLARE db_cursor CURSOR READ_ONLY FOR
SELECT name
FROM master.sys.databases
WHERE name NOT IN ('master','model','msdb','tempdb') -- exclude these databases
AND state = 0 -- database is online
AND is_in_standby = 0 -- database is not read only for log shipping
AND replica_id is NULL --without replica
OPEN db_cursor
FETCH NEXT FROM db_cursor INTO @name
WHILE @@FETCH_STATUS = 0
BEGIN
SET @fileName = @path + @name + '_' + @fileDate + '.BAK'
BACKUP DATABASE @name TO DISK = @fileName
FETCH NEXT FROM db_cursor INTO @name
END
CLOSE db_cursor
DEALLOCATE db_cursor


