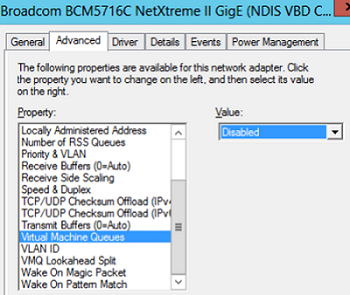
Virtual Machine Queue (VMQ) Mode in Network Adapter Driver
In some cases, if VMQ (Virtual Machine Queue) is enabled in a network adapter driver of a physical Hyper-V host, it may result in poor network performance in Hyper-V virtual machines. VMQ is a hardware feature and if it is not supported by your hardware but enabled in the driver, it can result in packet loss and increased network latency. The problem is typical to Broadcom Gigabit network adapters and occurs in all Hyper-V versions (Windows Server 2012 R2/2016/2019).
VMQ is designed to improve network performance by directly forwarding packets from a physical network adapter to virtual machines.
You can disable VMQ in the properties of your network adapter driver.
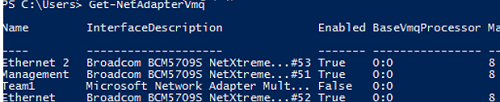
Or you can display a list of network adapters with VMQ support and their status using PowerShell:
Get-NetAdapterVmq
To disable VMQ for a specific NIC, run the command below (the network adapter will be unavailable for a couple of seconds):
Set-NetAdapterVmq -Name “NICName” -Enabled $False
After disabling VMQ, it is better to restart the host and check the network performance.
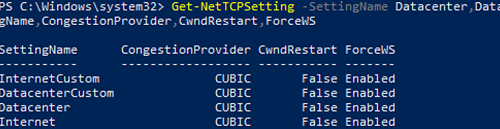
Optimize TCP Settings for Hyper-V on Windows Server 2019
Save the current TCP settings on your Hyper-V host and apply new settings that will make TCP settings in Windows Server 2019 almost similar to those of Windows Server 2016.
By default in Windows Server 2019 and Windows 10 1709+, the CUBIC implementation of TCP is used. This algorithm is optimized for high-speed networks with high latency (it is also used by default in Linux kernel 2.6.19 and newer).
Apply the following settings only in Windows Server 2019 or Hyper-V 2019.
Type cmd, right-click on Command Prompt, and then click Run as administrator
Copy and paste the following: explorer shell:::{05d7b0f4-2121-4eff-bf6b-ed3f69b894d9}
Press Enter
Select "Always show all icons and notifications on the taskbar"
Click OK
If the checkbox "Always show all icons ..." is greyed out, I'm not totally sure what fixed it yet but it appears that changing the EnableAutoTray value in the Regedit helped.
Фильтр определяет необходимые условия для включения объекта в результат запроса. LDAP-фильтр может содержать одно или более условий. Результат условия - "Истина" или "Ложь". Общий вид фильтра
3. Right-click on regedit icon, click Run as administrator 4. Go to HKEY_LOCAL_MACHINE\SYSTEM\CurrentControlSet\Control\Power\PowerSettings\238C9FA8-0AAD-41ED-83F4-97BE242C8F20\7bc4a2f9-d8fc-4469-b07b-33eb785aaca0 5. Double click on Attributes 6. Enter number 2. 7. Go to Advanced power settings (click on Windows button, write power options, click on Power Options, in the selected plan click on the Change plan settings, click on the Change advanced power settings). 8. Click on the Change settings that are currently unavailableMinimum value